Search Website
Assessments
Assignments & Rubrics
Yes, please follow the steps below. Please note that if you want to include Pass/Fail grades in the calculation of the final grade, you need to indicate points for those items.
A) Setting up the assignment:
1. On your course home page, go to Assessments on the navigation bar and select "Assignments." Then create a new assignment or edit an existing one.
2. Under "Grade out of," indicate the points the assignment is worth.
3. Choose "In Grade Book" and then select "Edit or Link to Existing."
4. Choose "Create or link to a new grade item."
5. If the assignment falls under a specific Grades category, indicate which one. If not, choose the Grade Type and select "Select Box."
6. Under "Grade Scheme," choose "Pass/Fail" from the drop-down menu. 7. Select "OK" to finish, and then save and close after all other assignment edits are done.
B) Grading the assignment:
1. On your course home page, go to Assessments on the navigation bar and select "Assignments."
2. Click on the desired assignment you would like to assess.
3. You can switch between viewing users and their submissions or just the submissions using the tabs.
4. Once you choose an assignment to grade, a new screen will open.
5. On the right side of the screen, you can select "Pass" or "Fail" under "Overall Grade."
Video Demo (Please make sure your YouTube video quality settings are set to high; otherwise, the video will appear blurry):
Note: If you wish to include the Pass/Fail item in the final grades but do not want students to see the associated points, you can adjust the student display option to show only the Grade scheme symbol. You can find instructions on how to do that here.
If you do not want to include points at all, it is recommended that you create the assignment as ungraded and then set up a grade item using the default Pass/Fail grade item. Using the setup item, you can then complete your grading in the grade book.
Helpful Links:
How to grade using the Grades tool
How to set up a grade item as Pass/Fail
No, Brightspace does not have this feature. A possible workaround is to provide the student with special access to the assignment and allow them to submit their files after the deadline.
You can find detailed instructions on how to set up special access by visiting this link. Please make sure that you are logged in to OWL Brightspace to access the link.
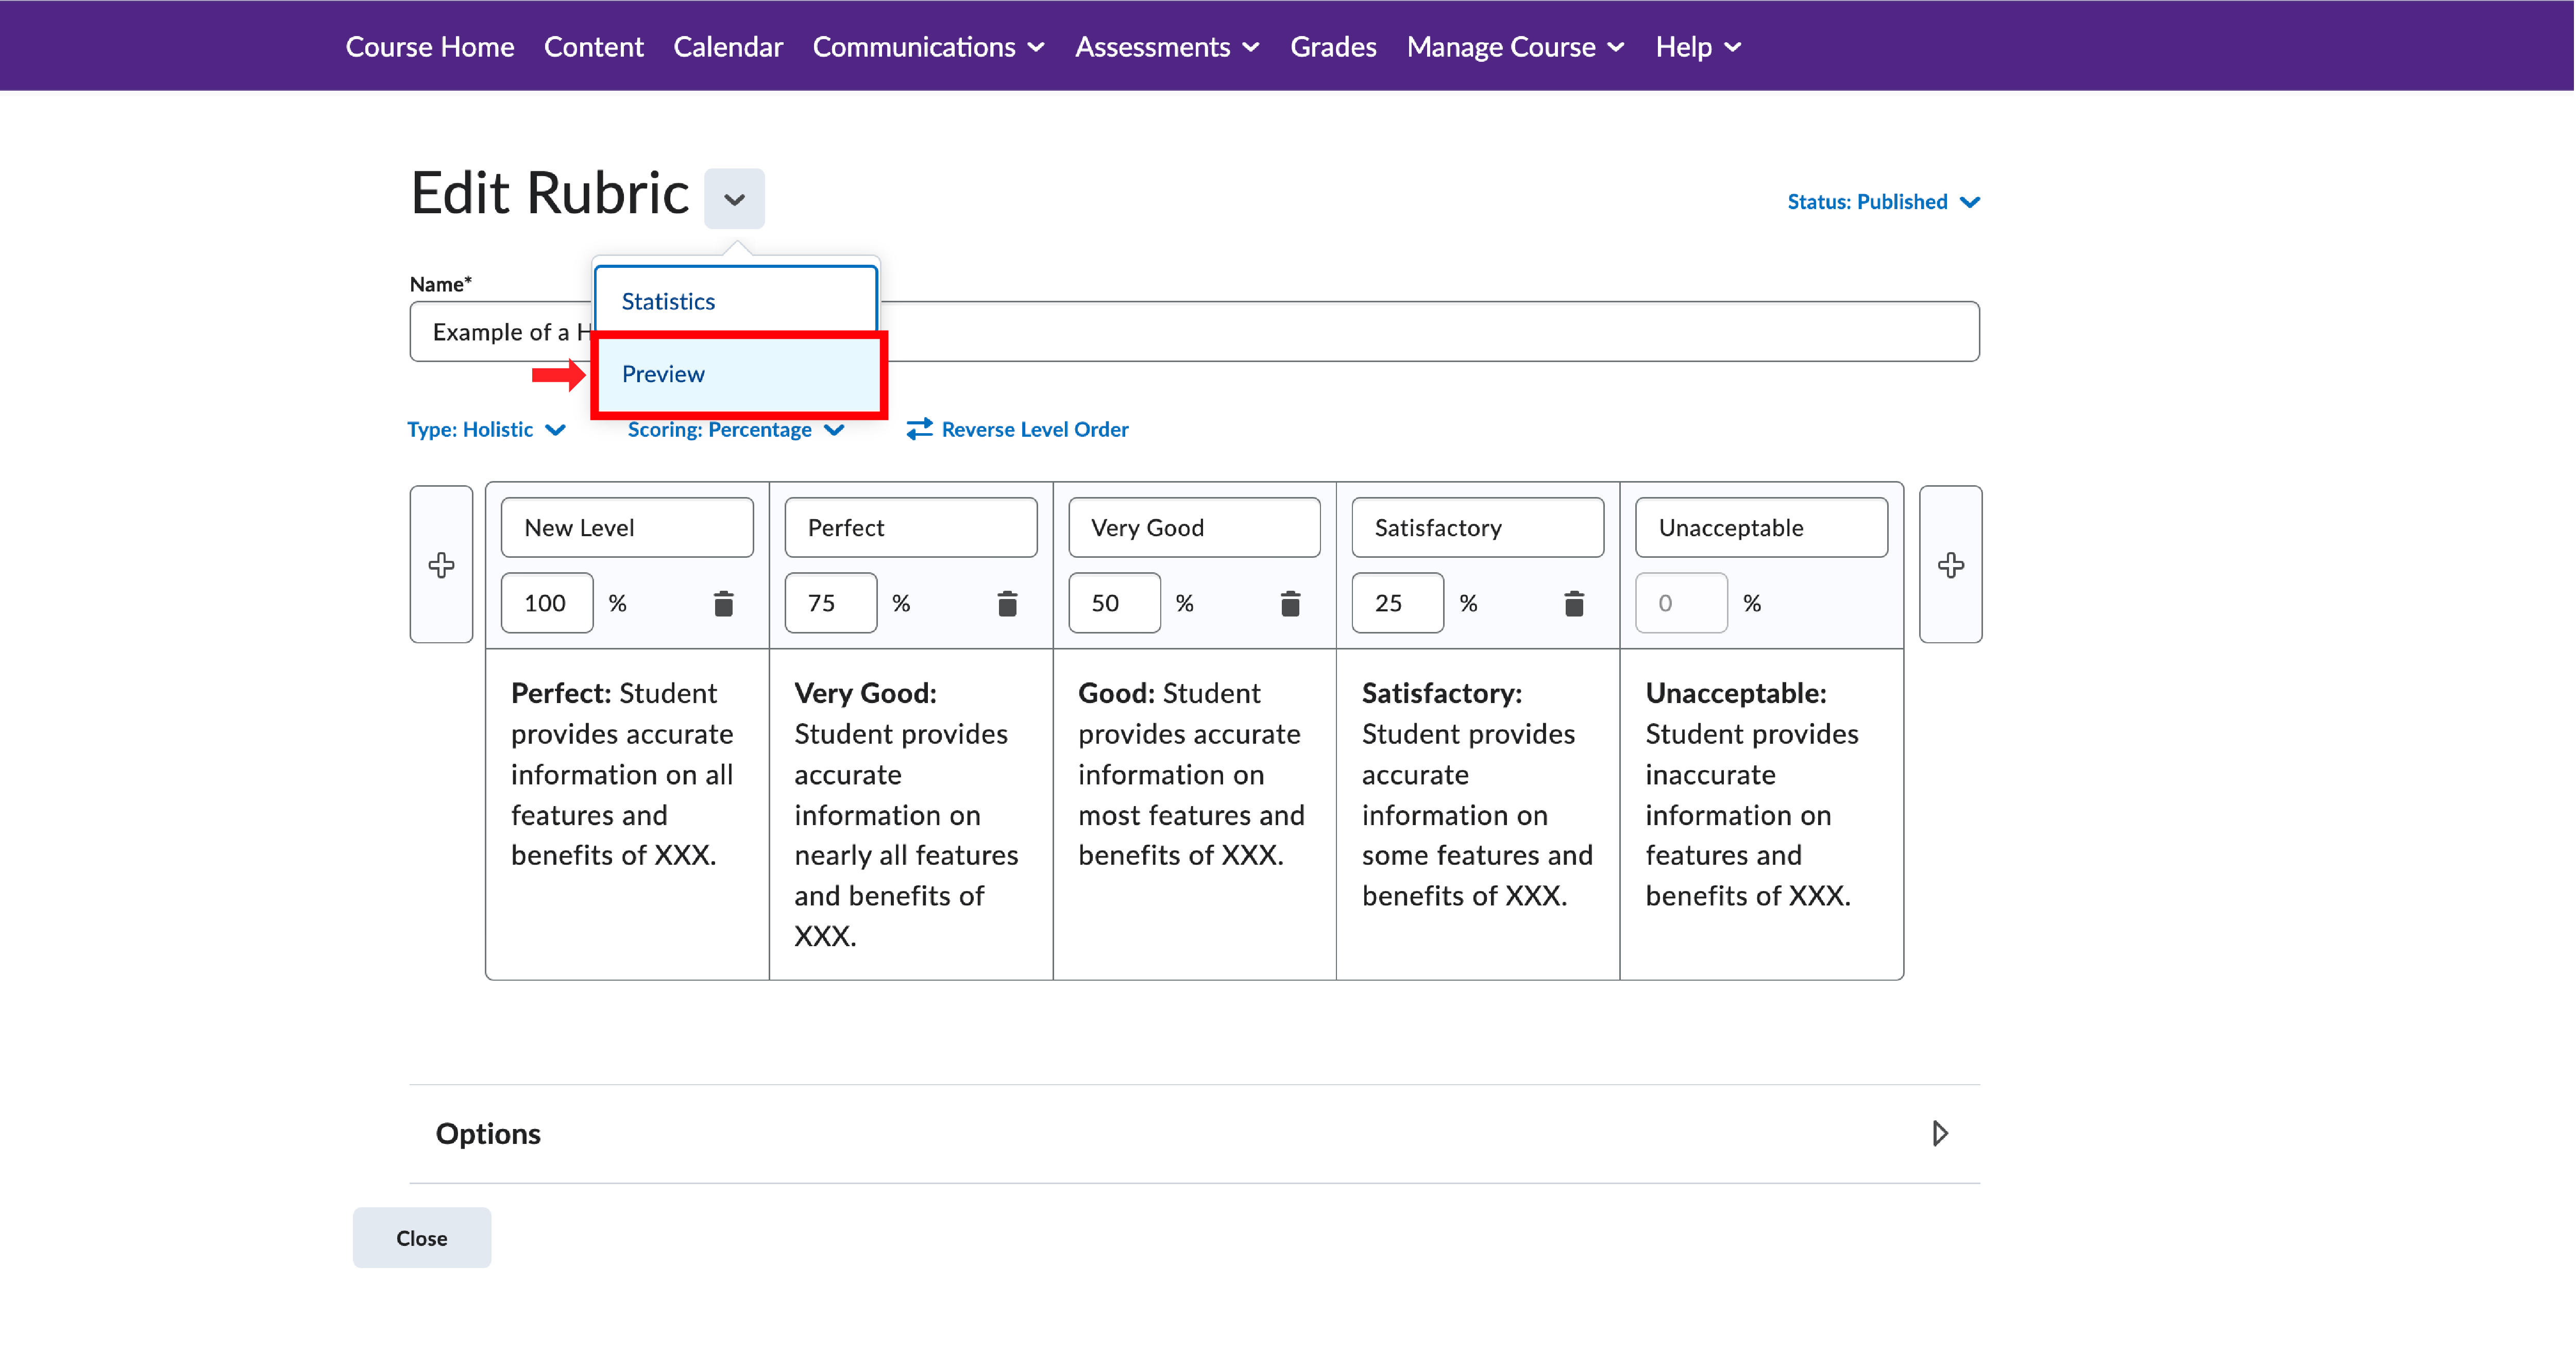
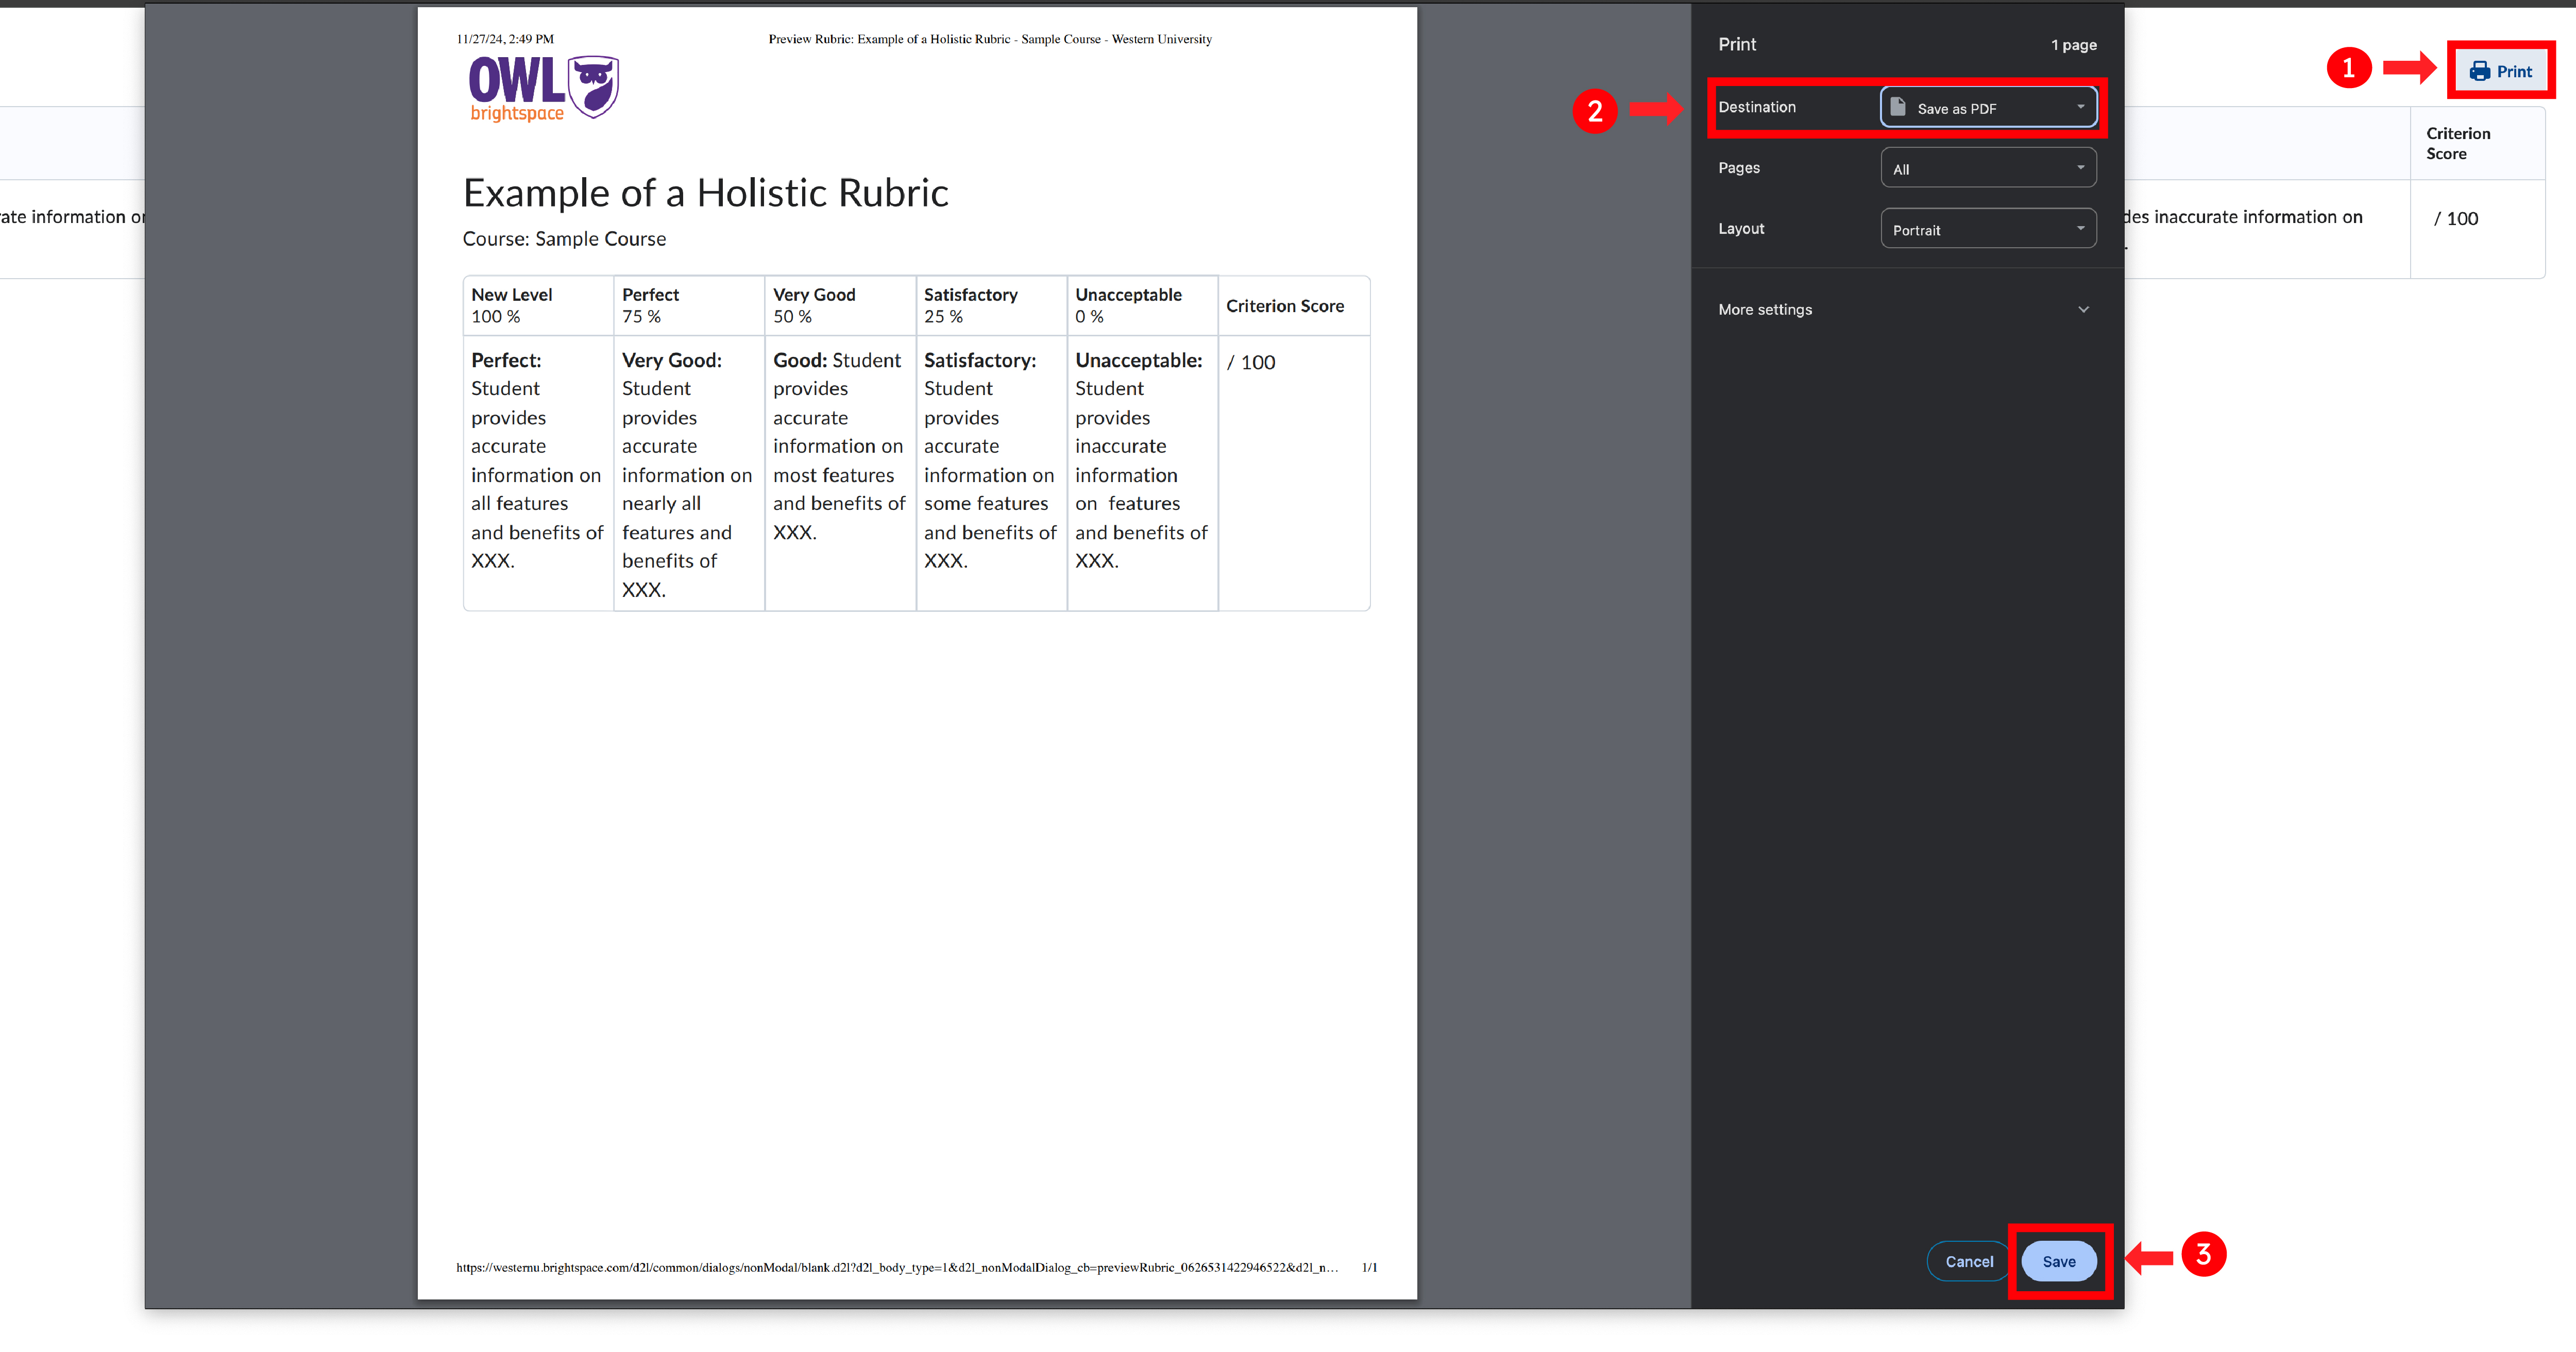
Instructors can download the preview of a rubric.
To save/ print a digital copy of the document, you can use the print option and select "Print to PDF".
Note: It's important to know that when learners upload a Microsoft Word document (docx) to Brightspace for annotation assessment, the system automatically converts it into a PDF format. This conversion process may alter the appearance of some images in the original file. Therefore, if you are unsure about the accuracy of the annotated file, we recommend downloading and checking the original docx file.
To grant accommodation requests for students who need them for their assignments, you will need to use the "Special Access" feature in the assignments tool editor.
Please follow the instructions provided in this link: Adding Special Access to an Assignment
Unfortunately, accommodation requests must be processed individually, as the groups tool cannot be used due to privacy concerns—group members can see each other. Currently, there is no system available for bulk enrollment of multiple students into the Special Access feature for assignments. The WTS team is actively exploring options to simplify this process for instructors, particularly those with large course enrollments.
Video Demo (Please make sure your YouTube video quality settings are set to high; otherwise, the video will appear blurry):
1. To begin, click on "assessments" on the navigation bar, then go to "Assignments," and from there, use the drop-down menu for the specific assignment to navigate to "Submissions."
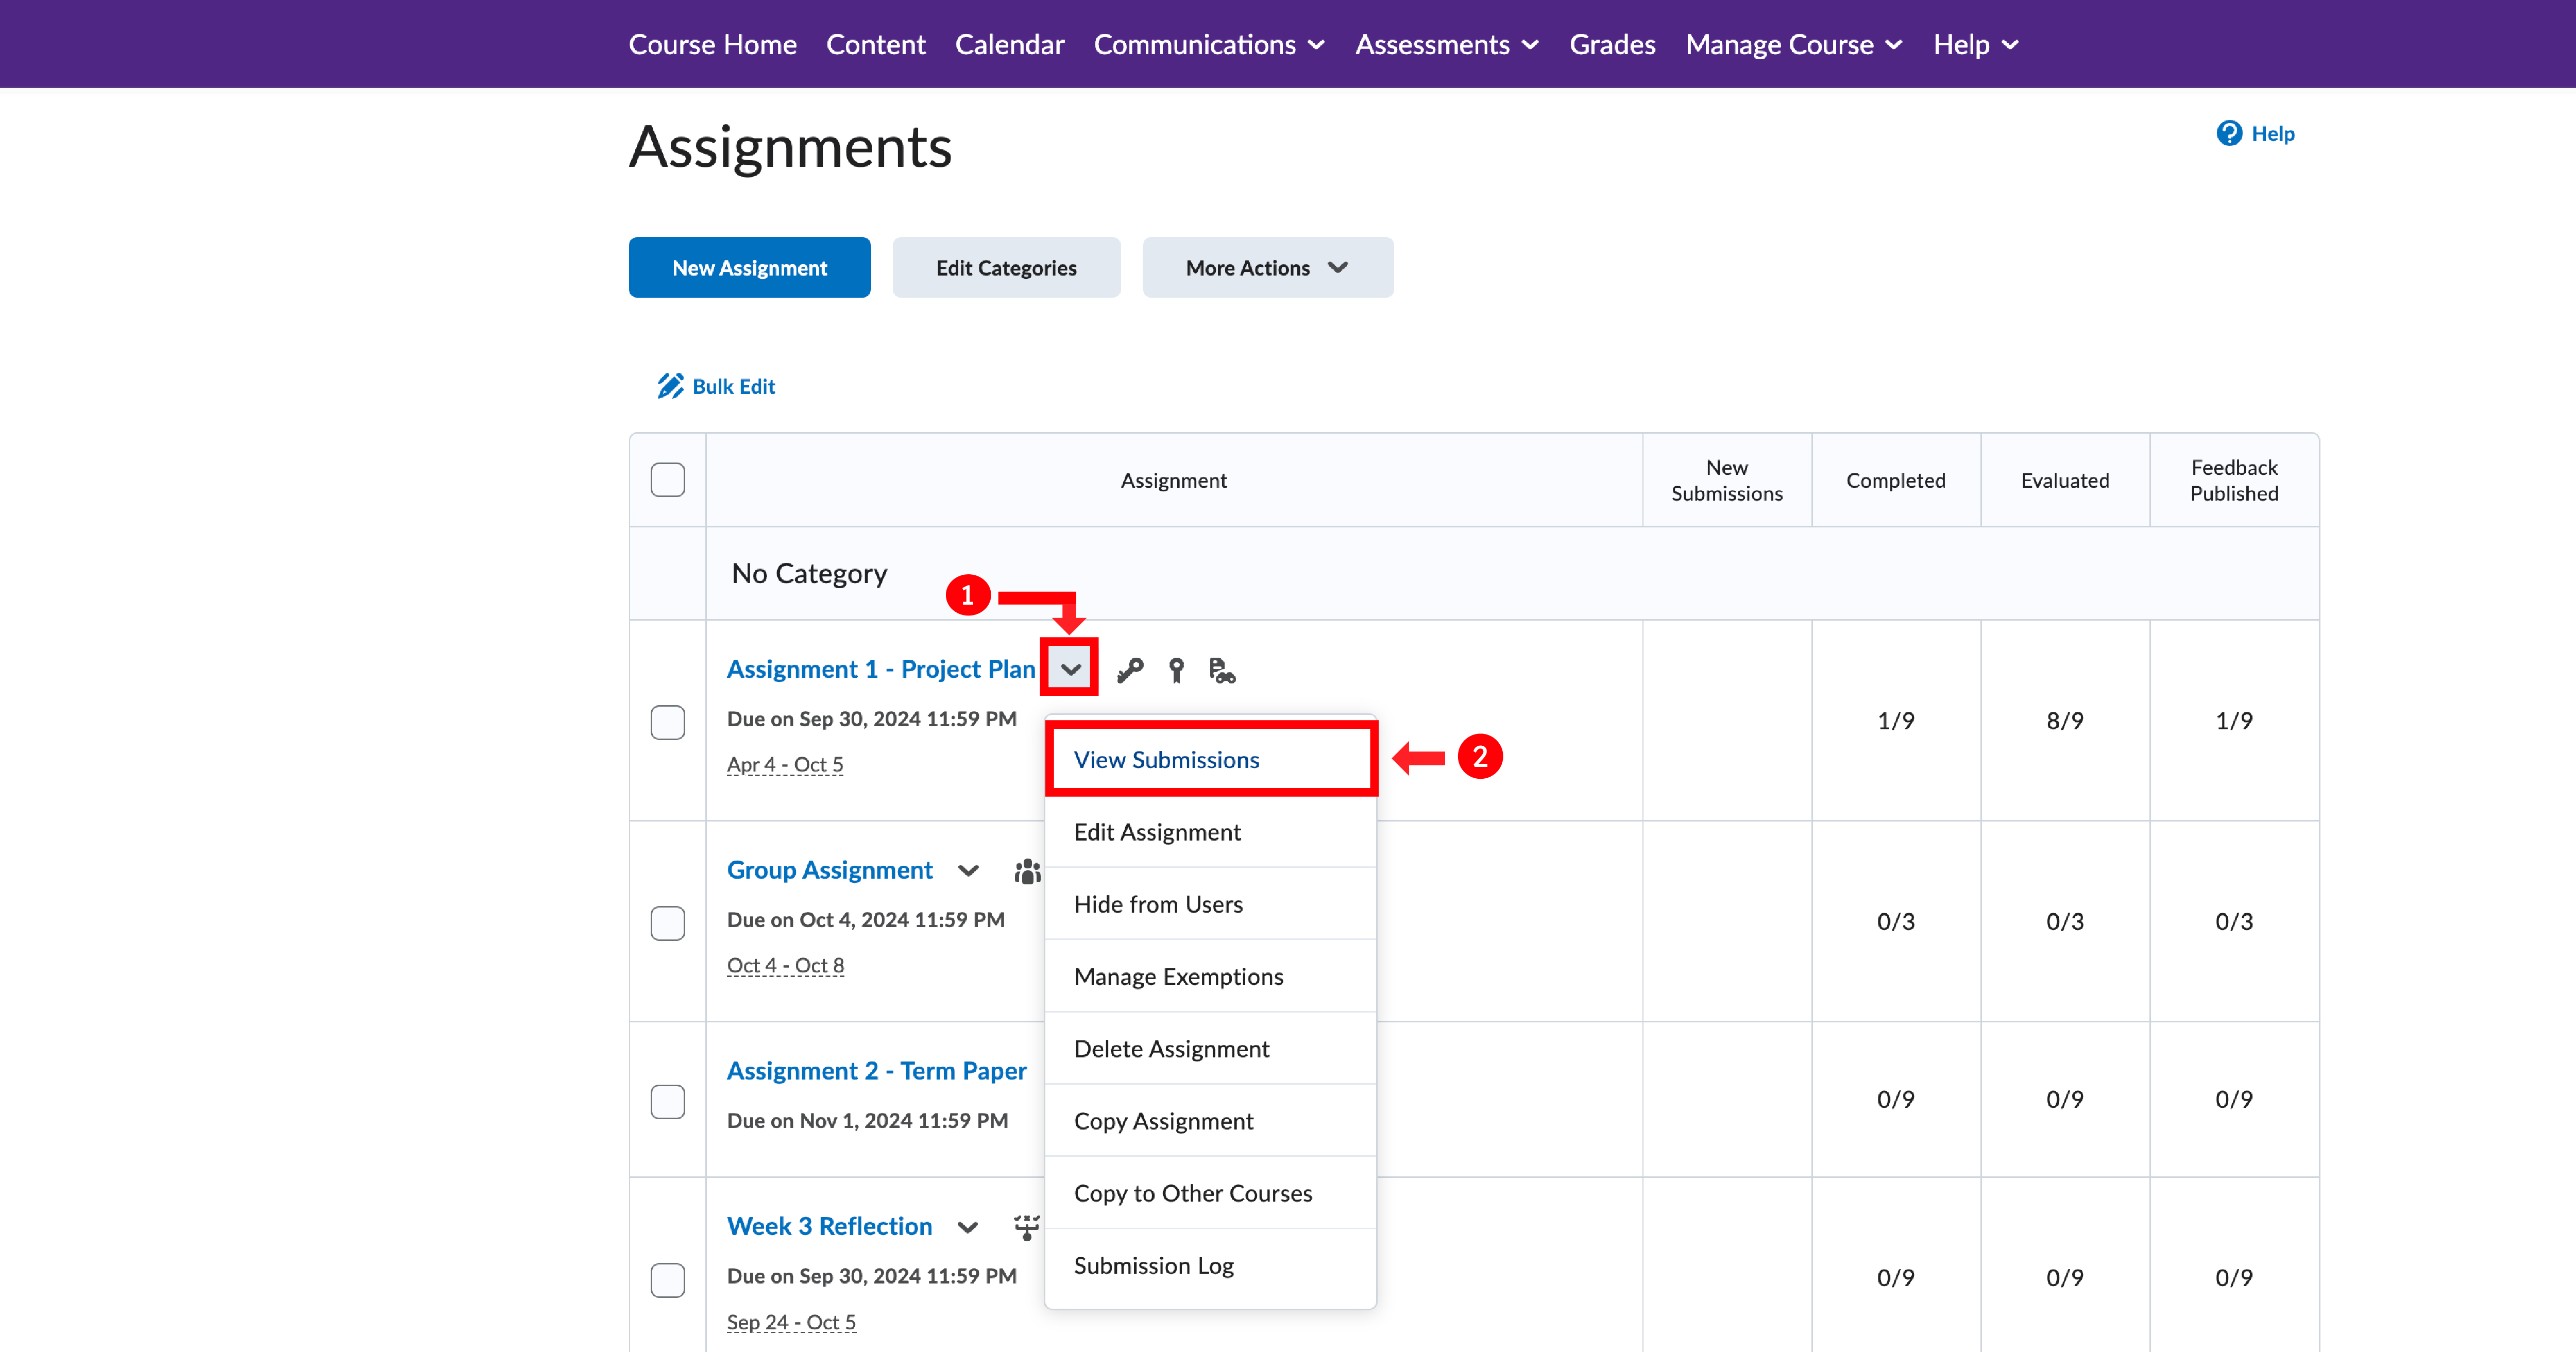
2. Under "Users," select and download all the assignments you need to grade. Within the downloaded zip folder, you will find separate folders for each user. From there, you can either edit each file in a user's folder or add a feedback file.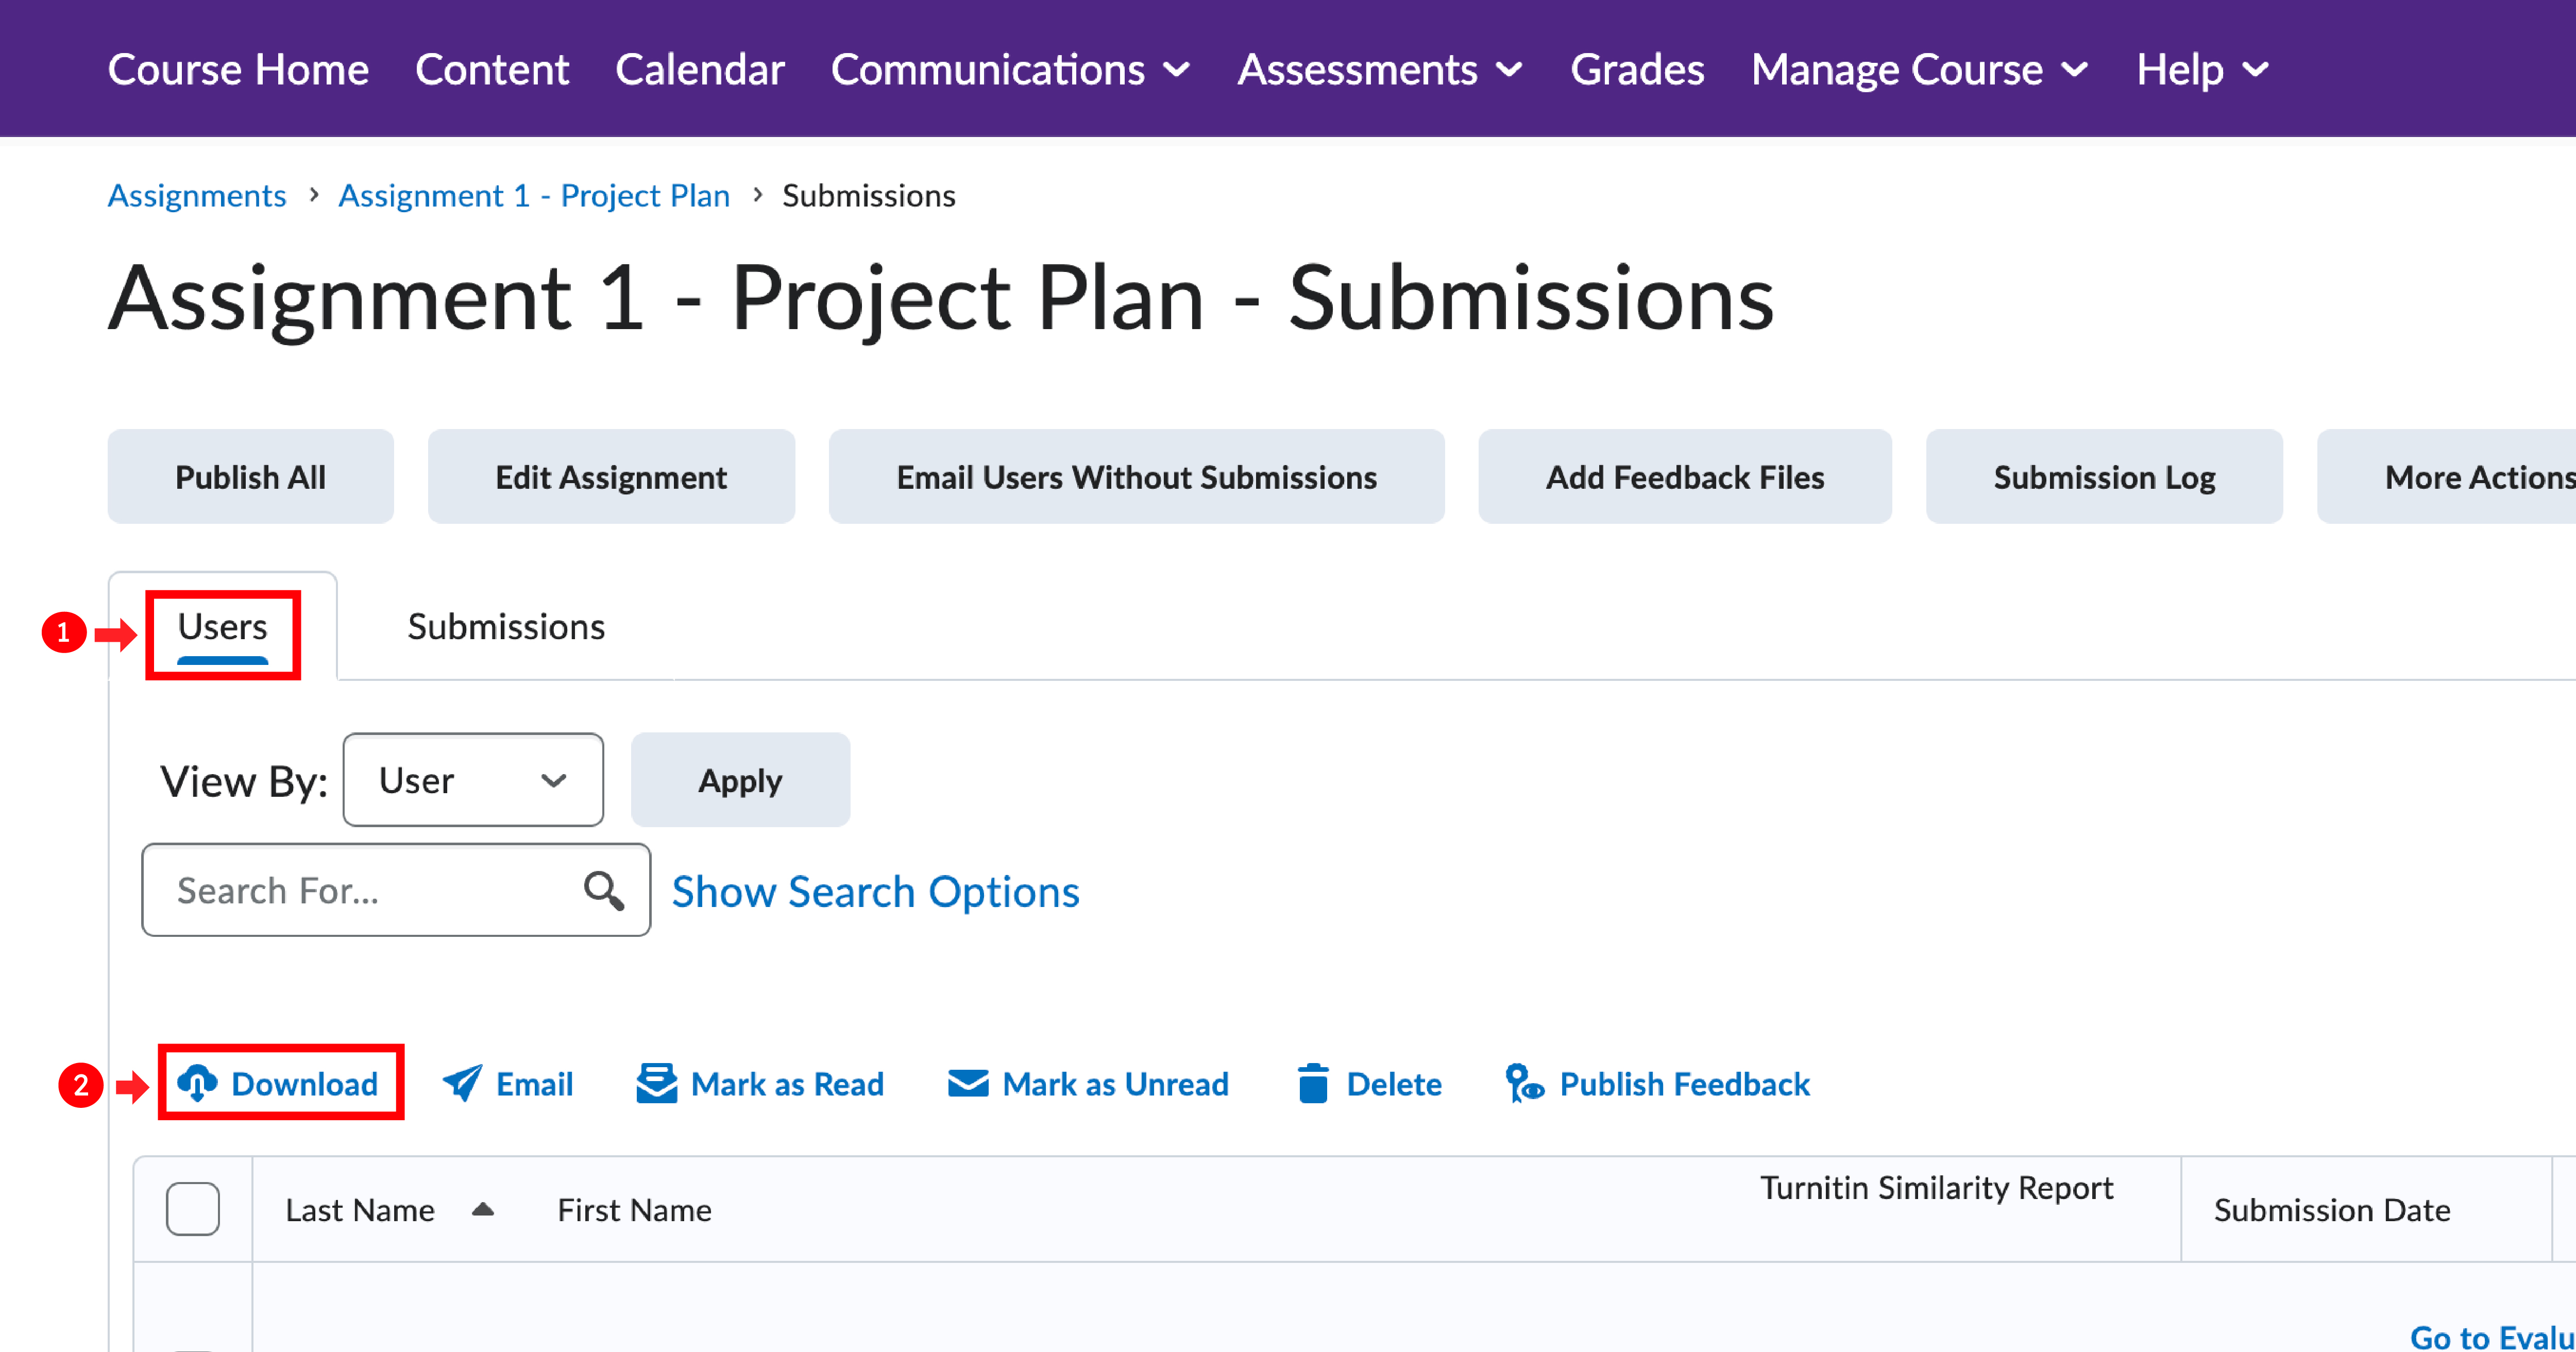
3. Once you have made all the necessary changes, save the files and re-upload the zip folder on the same submissions page under "Add Feedback Files." This will update each submission with the changes you made.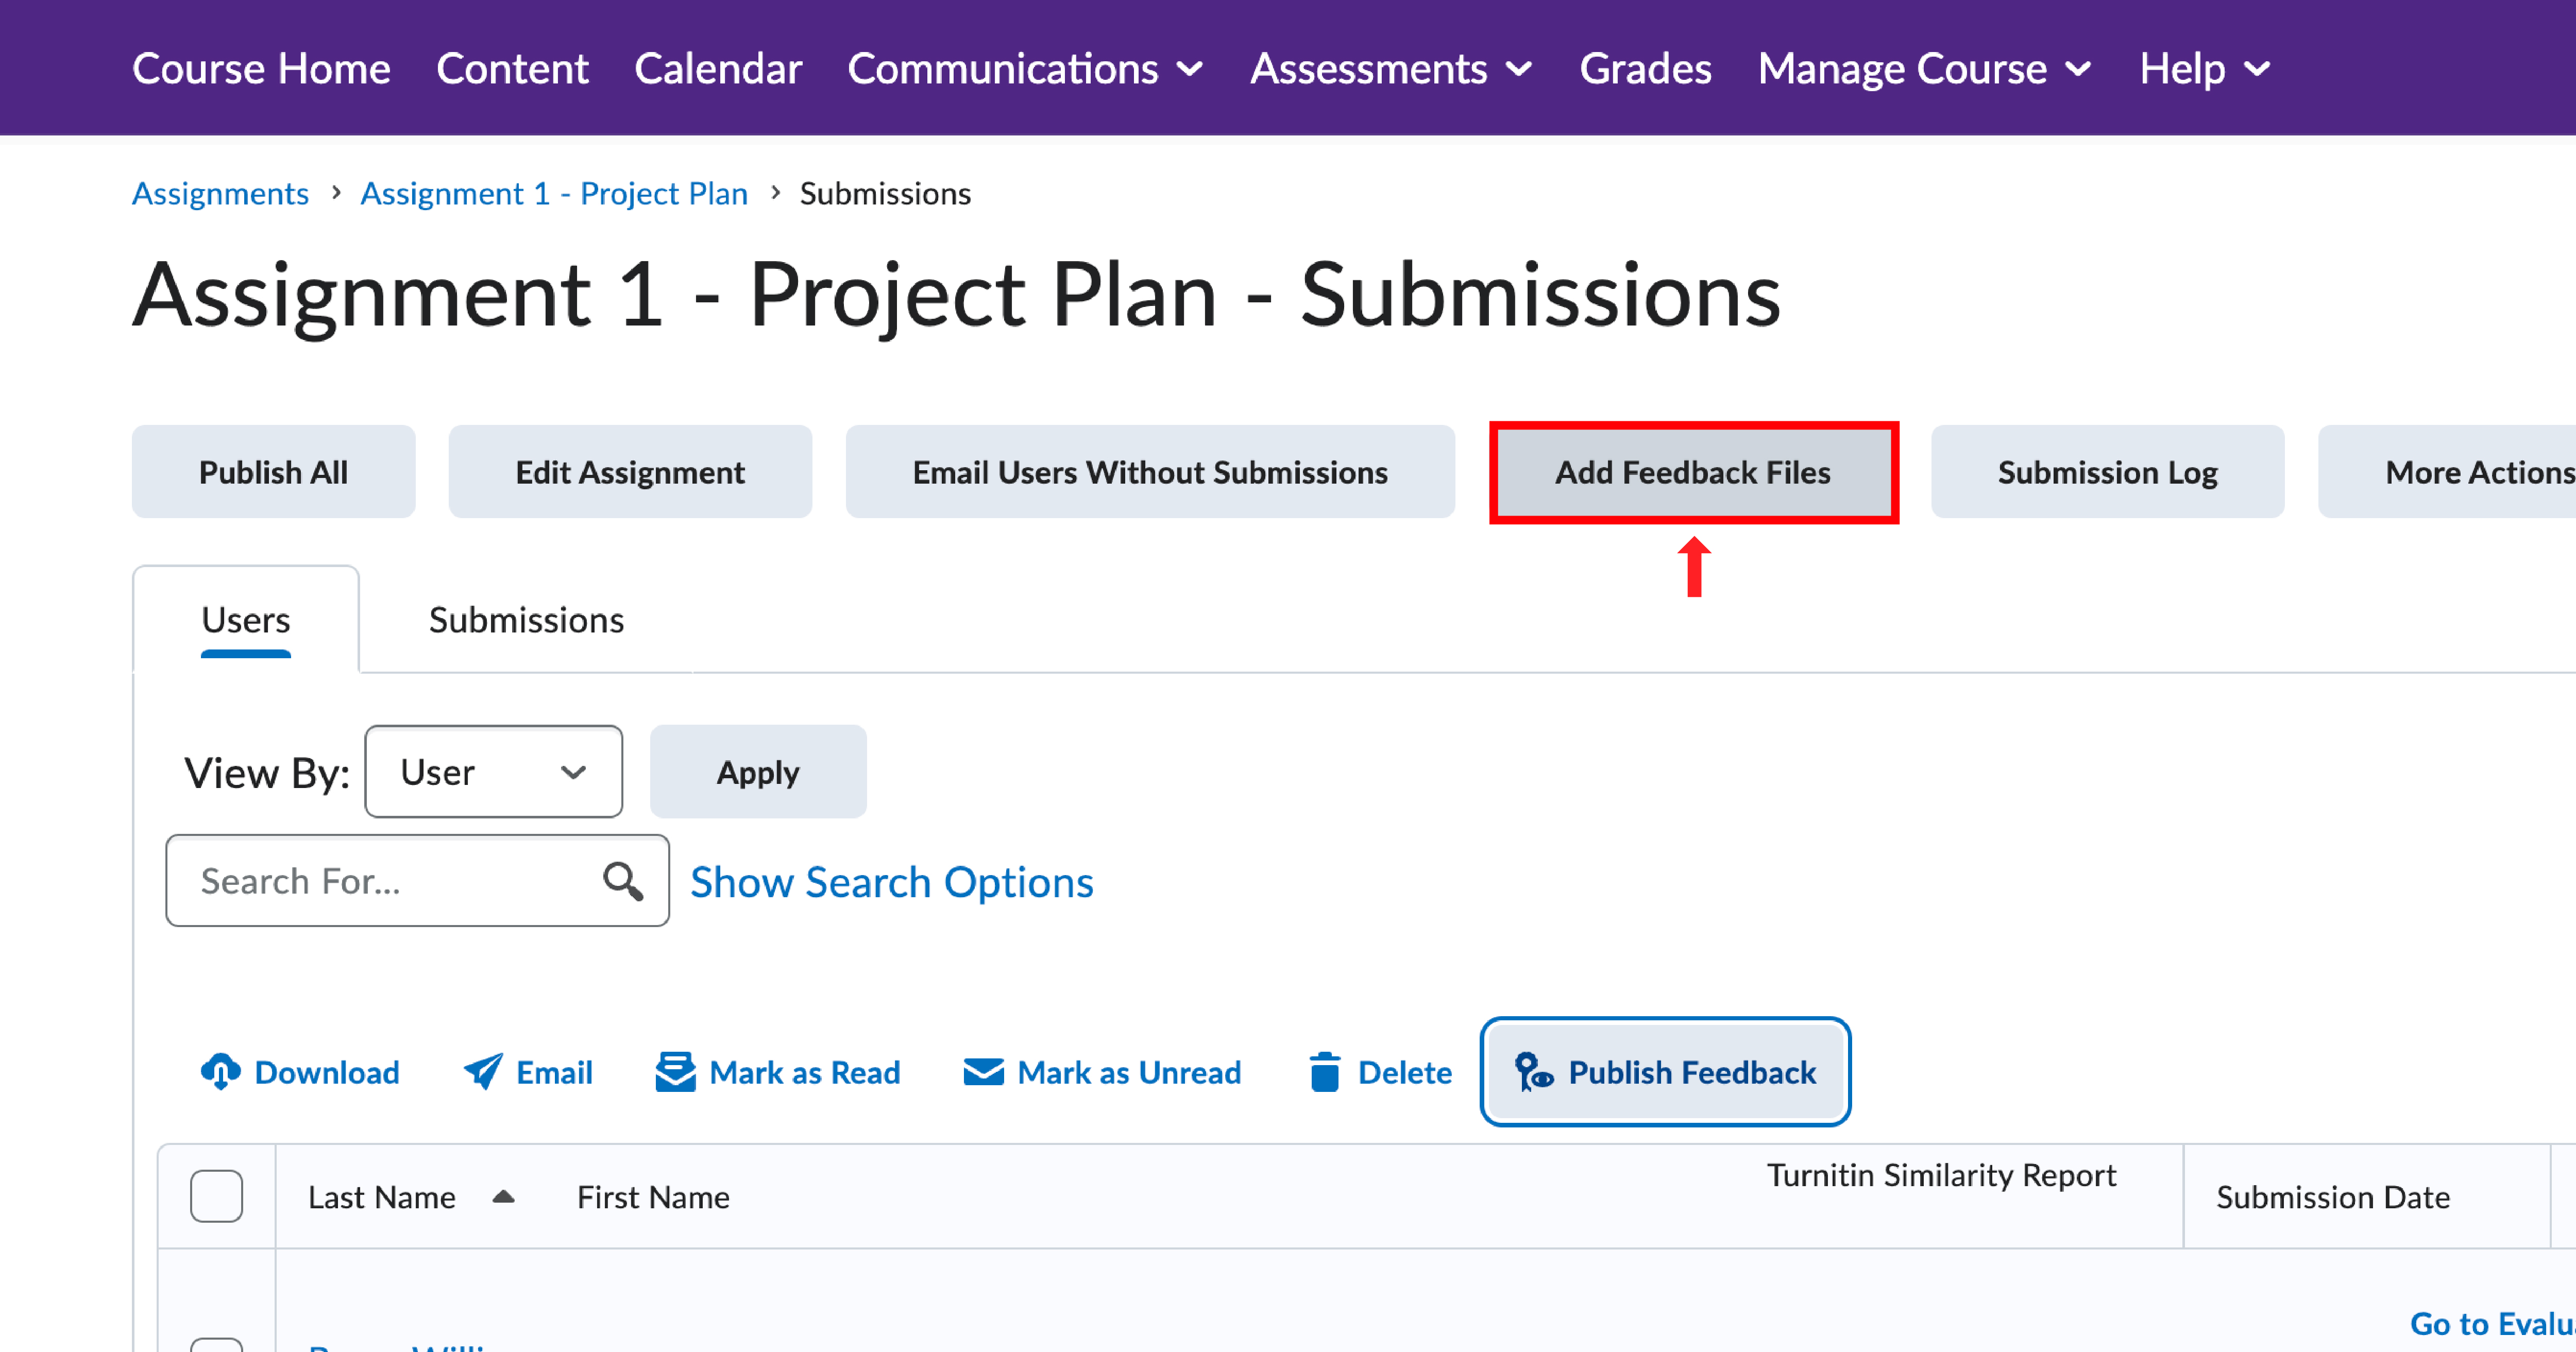
To ensure that all feedback is accessible to students simultaneously while grading assignments anonymously, it is recommended to use the "Publish All Feedback" option.
Quizzes, Surveys & Awards
To use a question pool to randomly select questions for a quiz so that each student gets different questions from the pool, follow these steps:
1. Log in to your account and go to the "Assessments" section on the navigation bar.
2. Find the quiz tool and select it.
3. Create a new quiz or edit an existing one.
4. In the quiz editor, choose the "Question Pool" option under "Create New".
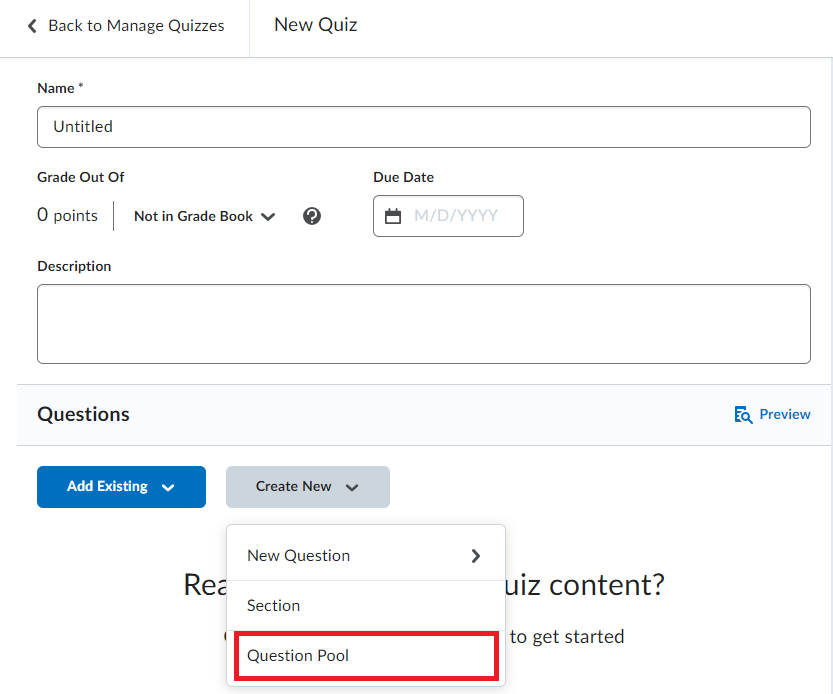
5. Fill in the required information such as the number of questions you would like pulled from the pool of questions and the worth of each question.
6. Browse and select all the question pools you would like to be randomly chosen from.
When you edit a quiz question, the scores of students who have already answered that question won't be updated. Instead, a new question will be created, and it will only affect those who haven't taken the quiz yet. The original question will still be present on the students' quiz attempts. Therefore, you should update how the original question is scored instead of editing the question.
To update the scoring of a quiz question, follow these steps:
1. Click on "Assessment" in the navigation bar.
2. Select "Quizzes" from the menu that appears.
3. Find the quiz for which you want to update the scoring of a question.
4. Click the down arrow next to the name of the quiz.
5. Select "Grade" from the menu that appears.
6. By default, the view will show you the completed "attempts" of users. Click on the "Questions" tab.
7. You can (re)grade the questions on the quiz using any of the three options available: Please follow the steps below to grade the student's answers.
A) If you want to see each instance of how the question was answered by the individual students who received the question:
1. Fill in the bubble for "Grade Individual Responses".
2. Click directly on the question you want to regrade.
3. You will see a single student's answer to the question. Place a new score for the question in the score field if needed.
4. Click "Save and Continue" to update that student's score and review the next student's answer to the question.
5. Repeat until all student's answers have been reviewed.
B) If you want to give points to all students regardless of how they answered the question:
1. Fill in the bubble for "Update All Attempts".
2. Click directly on the question you want to regrade.
3. Fill in the bubble for "Give to all attempts ( ) points".
4. Fill in a point value.
5. Click "Save".
C) If you want to give points to each student who selected a specific answer on the question:
1. Fill in the bubble for "Update All Attempts".
2. Click directly on the question you want to regrade.
3. Fill in the bubble for "Give to attempts with answer ( ) ( ) points".
4. Select the correct answer.
5. Fill in a point value for that correct answer.
6. Click "Save".
Video Demo (Please make sure your YouTube video quality settings are set to high; otherwise, the video will appear blurry):
To restrict learners from seeing a quiz grade and feedback before the submission deadline, follow these steps:
1. In the quiz editor, under the evaluation and feedback section, check the "auto-publish" and "synchronize to the grade book" boxes (if the quiz counts towards the final grade).

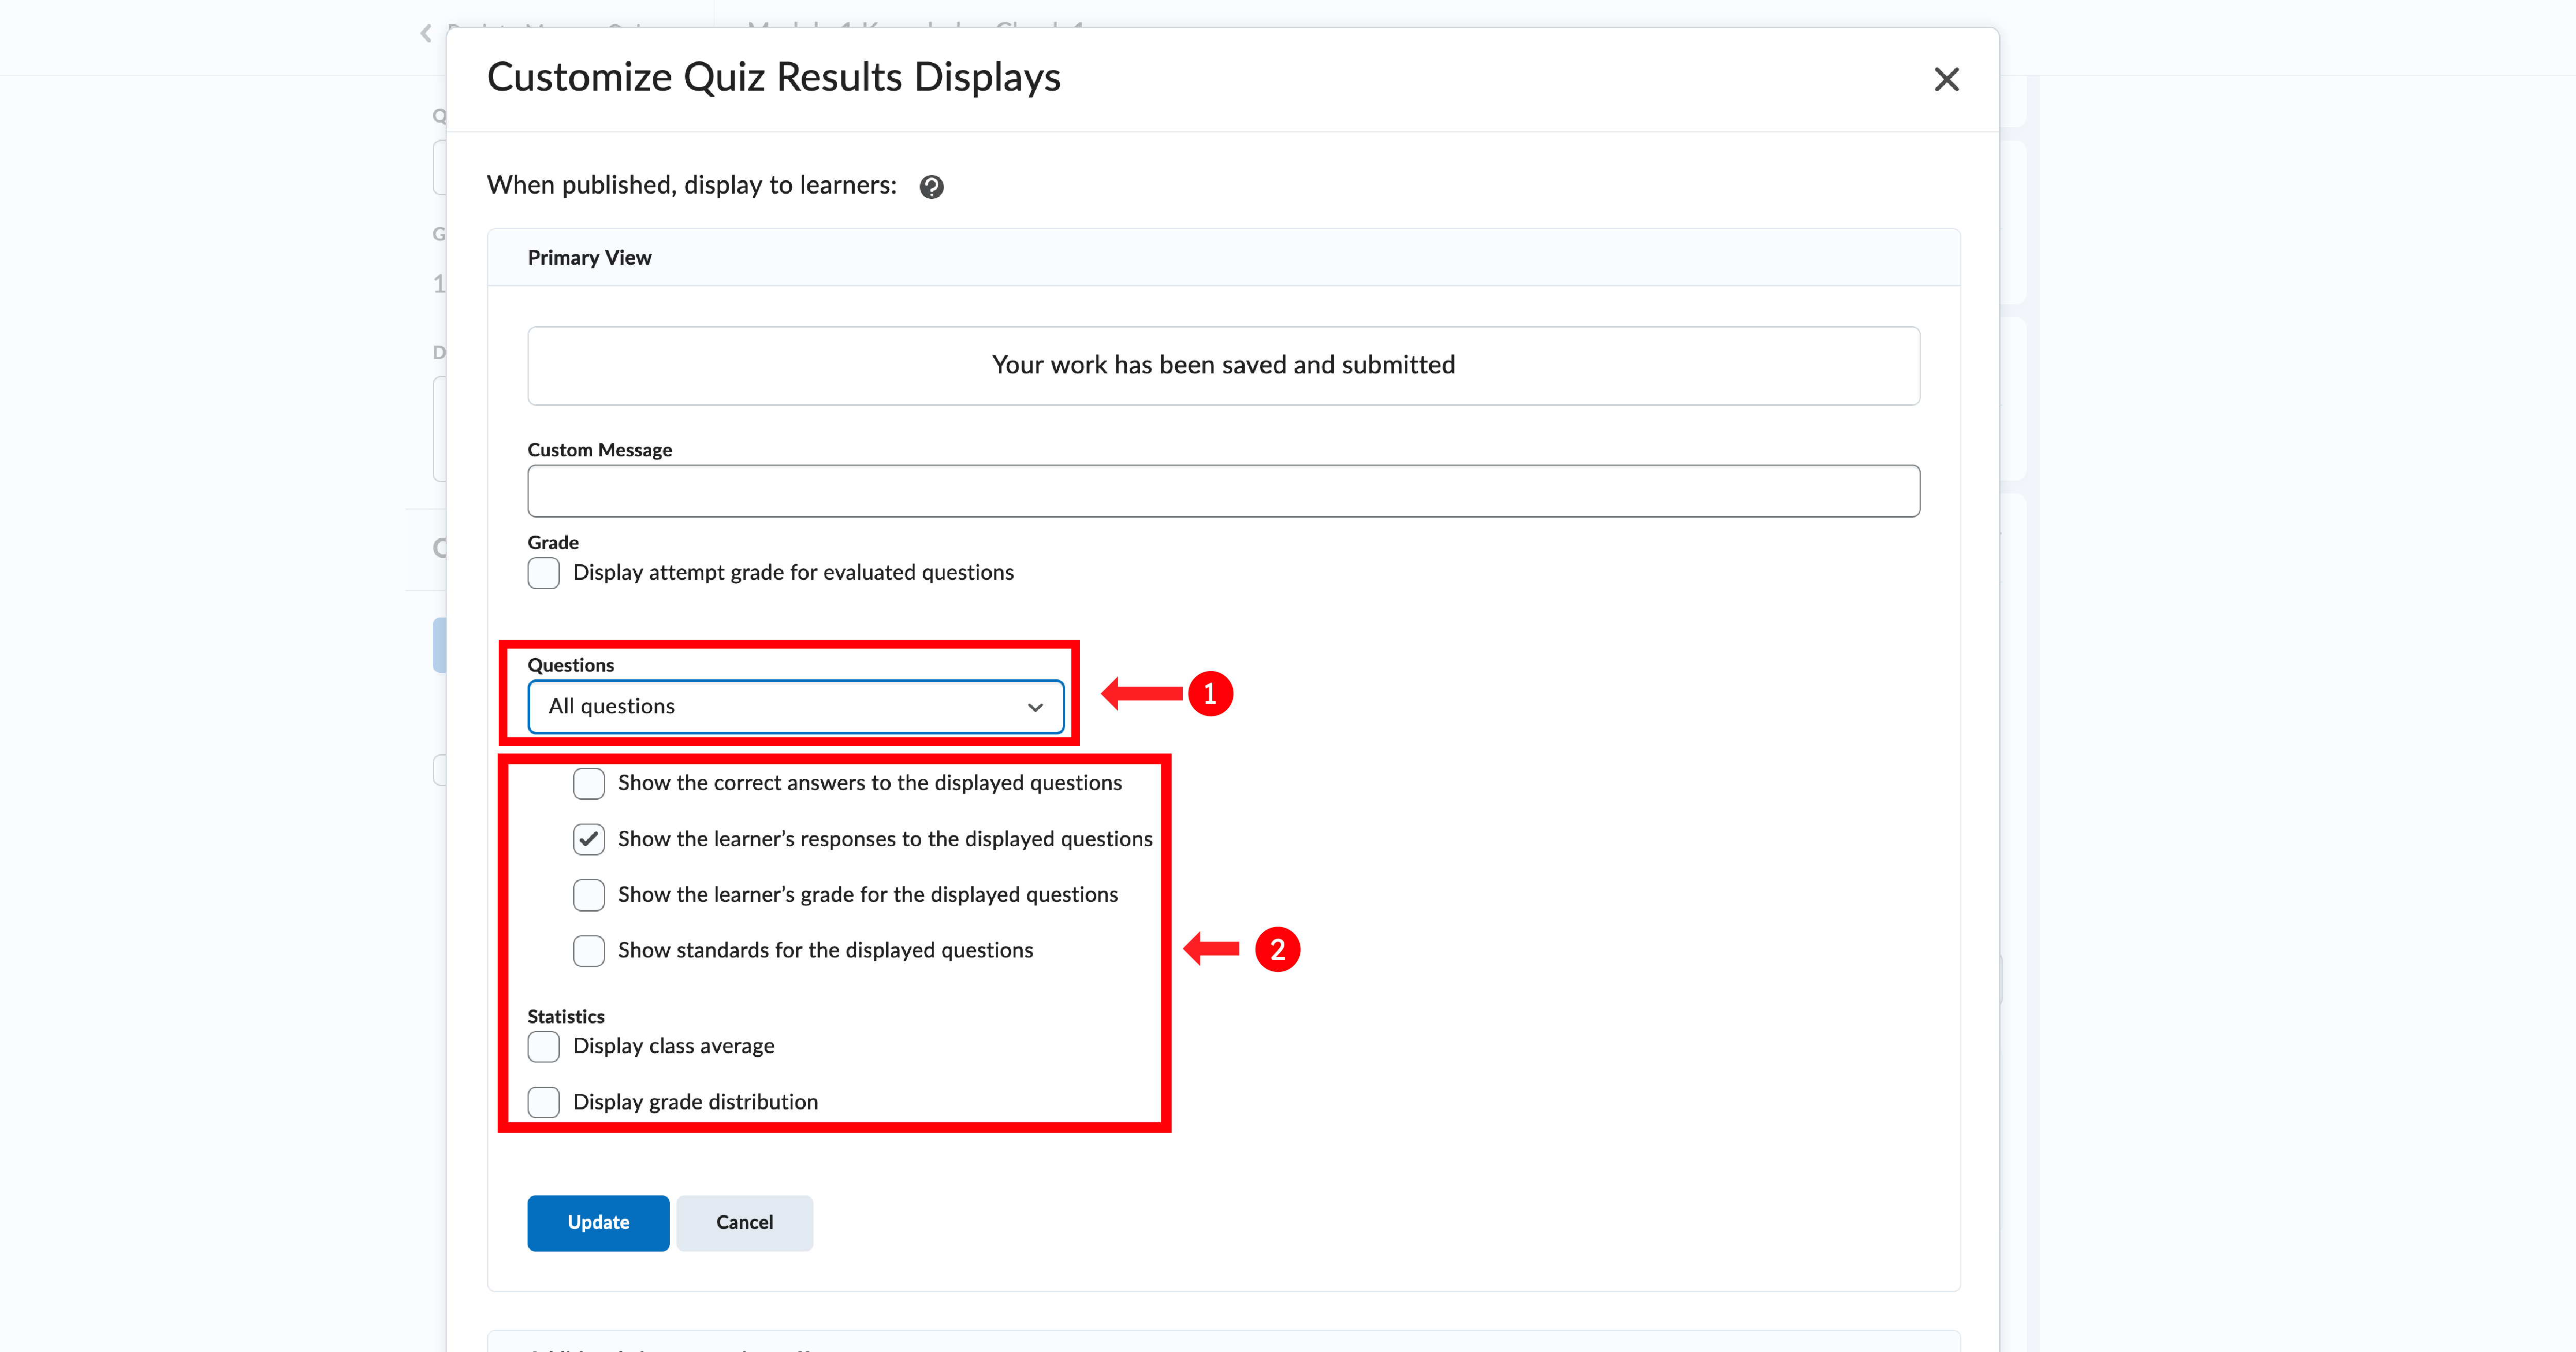
2. Set an additional custom quiz display view with the following options: either grade invisible or visible, and show all questions with correct answers, and learner's responses. Depending on whether you want the grade displayed along with the feedback.
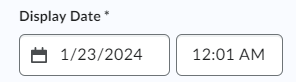
3. Set the display time to your due date.
Please note that if the grade item is in the grade book, you also need to set up a release date so that grades will not show there.
4. In the grades tool, go to "Manage grades" and click on the quiz.
5. Select "restrictions" at the top and set the start date to your due date.
By following the above steps, students will only see their grades and correct answers after the due date has passed.
Video Demo (Please make sure your YouTube video quality settings are set to high; otherwise, the video will appear blurry):
Yes, you can print or download a PDF of your quiz, and you can optionally add your answer keys and other details, such as the quiz description.
You can find more information about printing quizzes here.
It is not recommended for instructors to use ScanExam or Scantron for uploading DPC files into Brightspace, as it is not supported by the system. Instead, instructors can use Gradescope's Bubble Sheets, which is integrated into Brightspace and serve a similar purpose.
It is important to note that Brightspace does not use student numbers for grading, but rather uses the OrgID, which is the Western username.
To use the Gradescope Bubble Sheet, please follow the steps below:
1. Make sure to link your Gradescope course in OWL Brightspace. You need to do this so that you can sync your grades back into Brightspace after evaluating them. You can find more information here.
2. Once your course is in Brightspace, please visit Gradescope.ca and log in using the School Credentials option and select Western University. You will be brought to a page where you need to use your Western credentials to log in.
3. On your Gradescope dashboard, find and click on your created course site.
4. Select "assignment" on the left sidebar and create the assignment.
5. Under the assignment type, select "Bubble sheet" (Please be sure to download and print Gradescope's Bubble Sheet Template for your in-person tests).
6. Then click "Create assignment."
The video below shows you how to create a Bubble Sheet using Gradescope:
Related Support Documentation: Bubble Sheet Assignments - Gradescope Help Center
Currently, it is not possible to link the Surveys tool with a grade item. However, you can use quizzes as an alternative. To accomplish this, follow the steps outlined in one of the two options below:
Option 1: Create a quiz with all questions worth zero points
1) Create a quiz.
2) For each question, set the point value to 0. This ensures that students will receive no points regardless of their responses.
Option 2: Use bonus questions.
1) Create a quiz for the survey questions and include a mandatory multiple-choice question that is worth one point. Set the custom weights of each answer choice to 100%. This ensures that students will receive one point regardless of their response.
2) Include other questions and set each as a bonus. If the quiz will be added to the grades tool, remember not to check 'Can Exceed' on the grade item so that students receive 1/1, regardless of their quiz responses.
Video Demo (Please make sure your YouTube video quality settings are set to high; otherwise, the video will appear blurry):
Yes. To achieve this, follow the steps below:
1. Log in to your account and go to the assessments section on the navigation bar.
2. Find the quiz tool and select it.
3. Create a new quiz or edit an existing one.
4. In the quiz editor, choose the "sections" option under "create new".
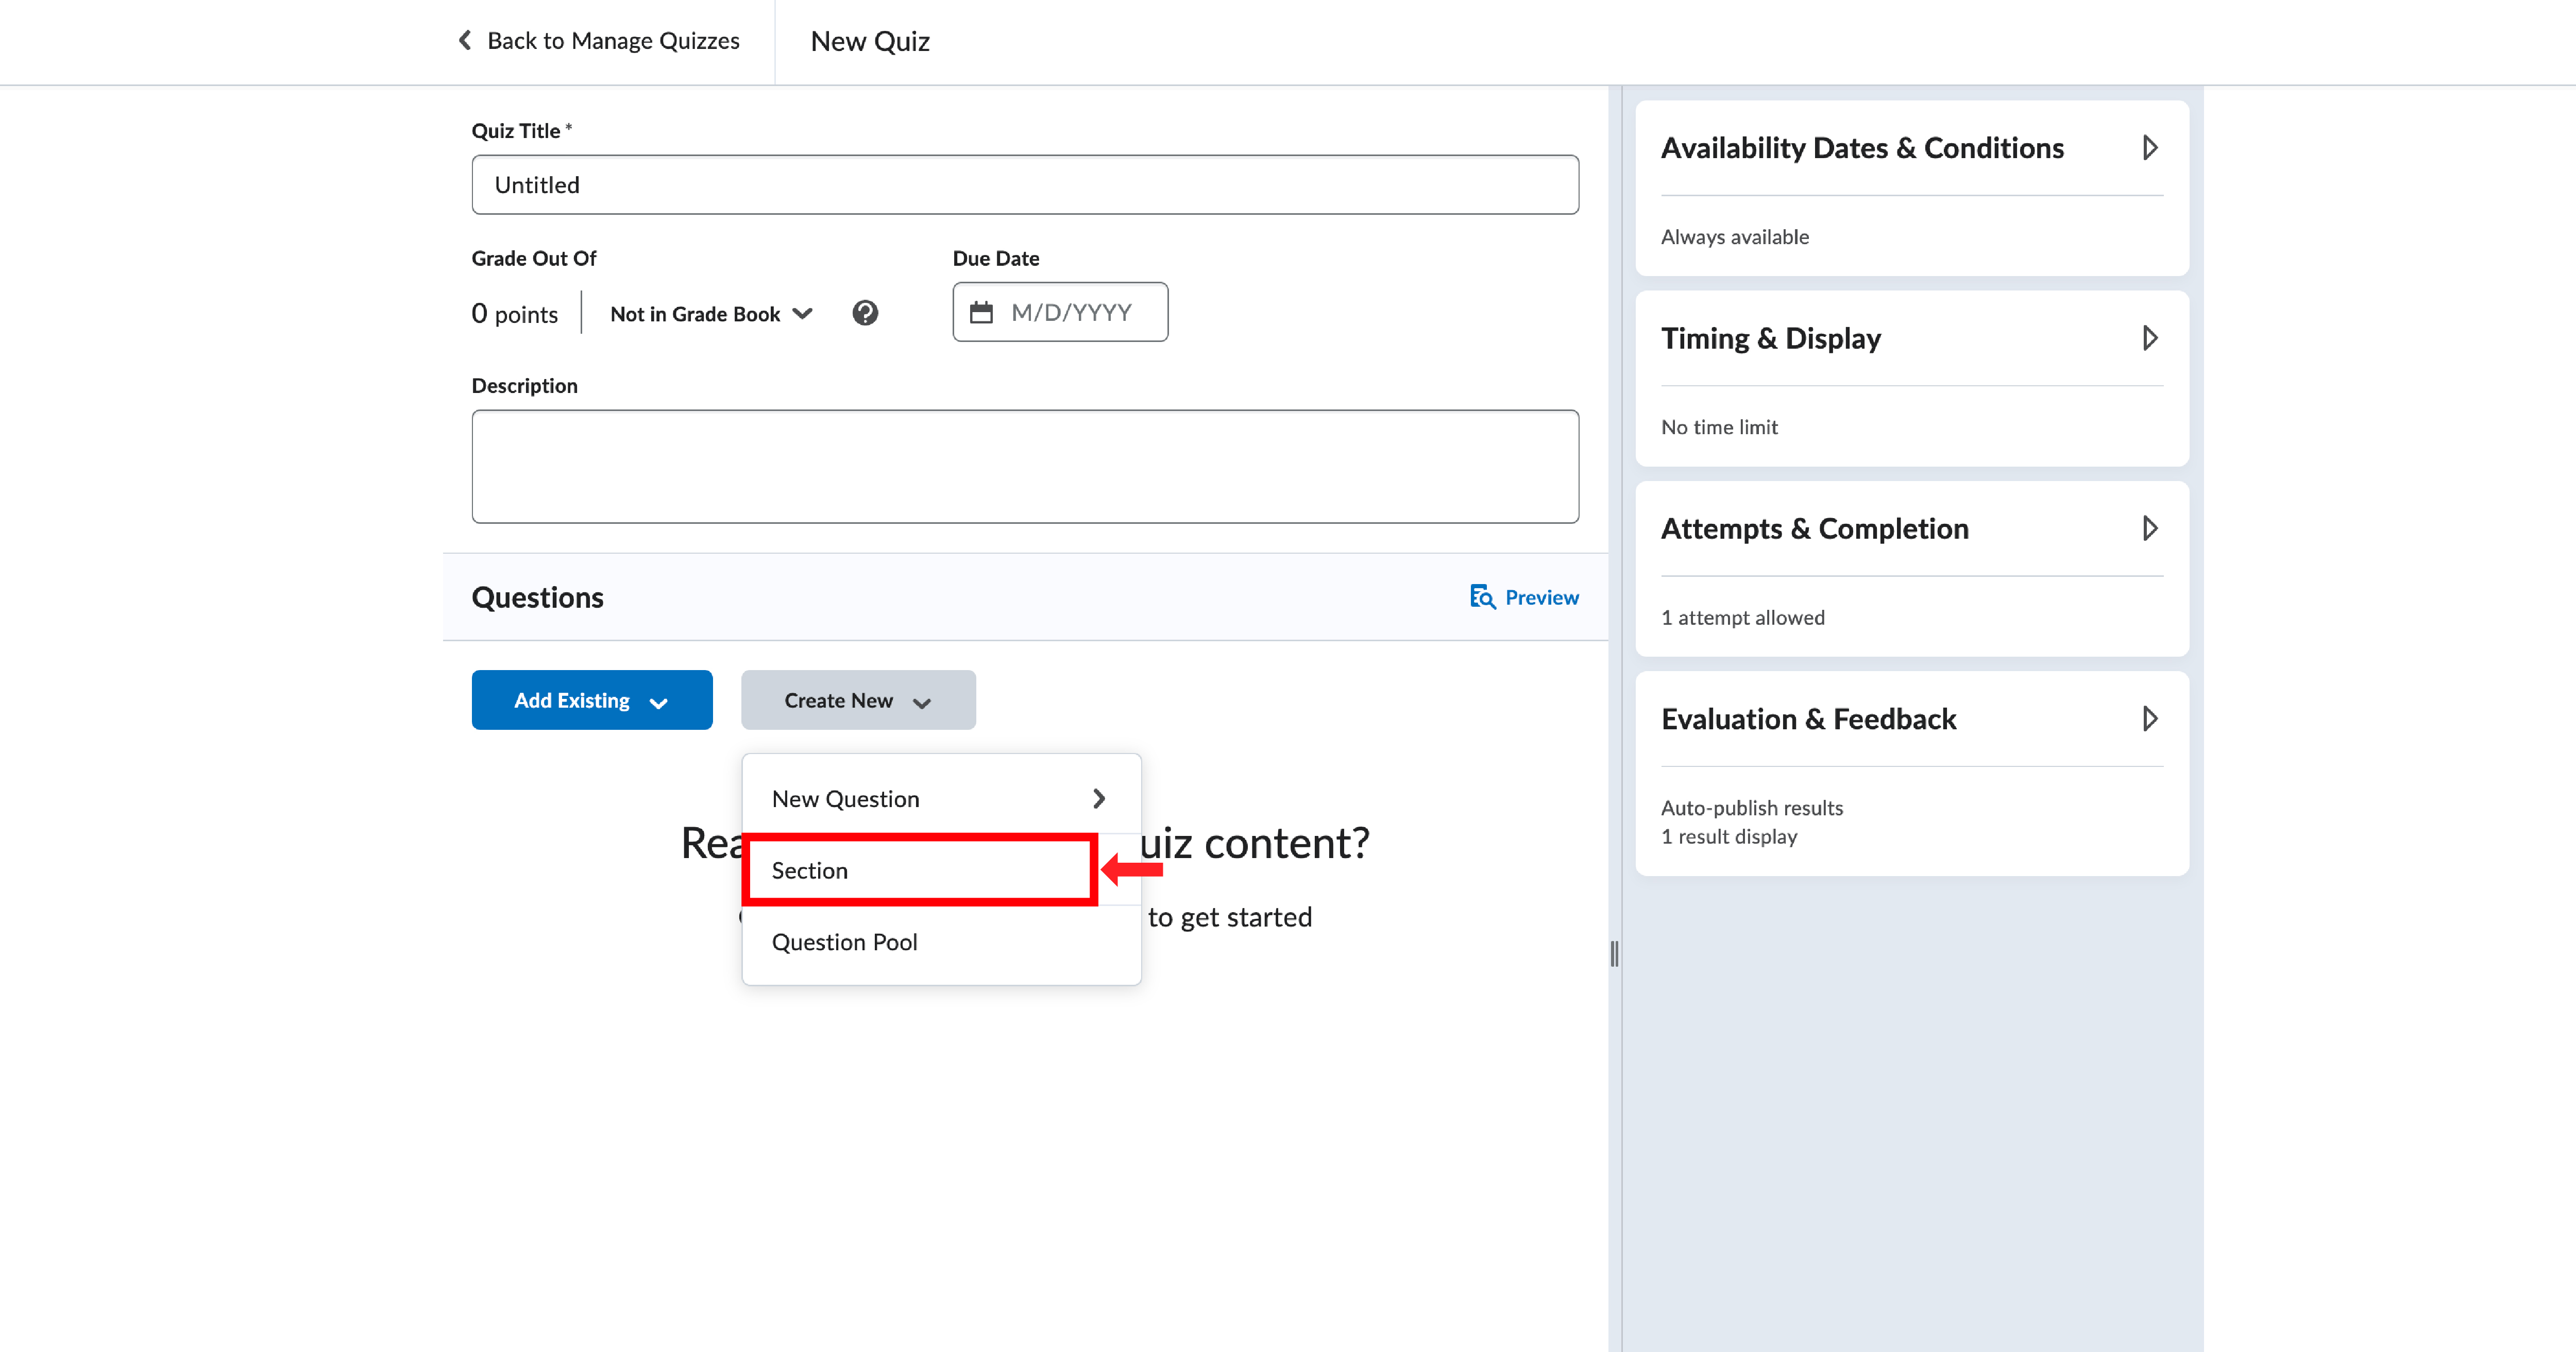
5. Fill in all the required information and save your changes.
Yes, you can make changes to an exam or quiz, but any changes you make while the assessment is in progress won't affect those who have already started it. The changes will only apply to future attempts.
Related Support Document: Insert and edit equations with Equation Editor - Brightspace
There are two ways to accommodate students with special needs:
- If the student needs accommodations for all quizzes in the course, please consider using the accommodations setting in the classlist.
You can set accommodations using the instructions via this link.
- However, if the accommodations vary depending on the quiz or assignment, please use the Special Access feature. You can follow the instructions via the links below:
Adding Special Access to an Assignment
Adding Users to Special Access in a Quiz
Note: Unfortunately, accommodation requests must be processed individually, as the groups tool cannot be used due to privacy concerns—group members can see each other. Currently, there is no system available for bulk enrollment of multiple students into the Special Access feature for assignments. The WTS team is actively exploring options to simplify this process for instructors, particularly those with large course enrollments.
Video Demo (Please make sure your YouTube video quality settings are set to high; otherwise, the video will appear blurry):
If you wish to email only students with accommodations, you can do so through the Classlist tool. Please note that this method will not include students with Special Access set up in assignments and quizzes.
To email students with accommodations, please follow these steps:
1. On your course Nav bar under Manage course, select Classlist.
2. Next to the search bar, click on "Show Search Options."
3. Then, tick the box next to "Users with Accommodations."
4. Finally, click the magnifying glass search icon to search.
5. Once you have filtered your search, select all rows by checking the box at the top of the list. Then click the email icon button above the student list to send them an email.
For more information on best practices and course setup, please explore our Self-Guided Training.
To grade written answer questions in the quizzes tool, select the “Grade” option for the quiz you wish to evaluate. You can attach rubrics to written response questions while creating your quiz to ensure consistency and fairness in your grading.
When you update a question in the Question Library, you have the option to choose where those updates will take effect, such as in every quiz that includes the question.
Yes, you can enable your learners to share their earned badges externally. There are several options available: you can allow learners to share on specific platforms such as LinkedIn, Badgr, and OpenBadges, or you can permit them to generate a public link. To achieve any of these, follow the steps below:
1. In the course navigation bar, select "Awards" under the "Assessments" option.
2. From the menu, choose "Course Awards."
3. Check the box that corresponds to how you would like learners to share their awards.
4. Once you check any of the boxes, your learners will have the option to share their awards accordingly.
At this time, Brightspace does not have the capability to award the same badge to a learner more than once. To give the same badge to a learner multiple times, you must create a new badge each time.
Yes, you can customize the quiz completion display. Creating a custom submission view offers learners additional insights. See the video below for instructions on how to do this.